This started-off as a how-to on installing ownCloud. But their own installation procedures don’t work for the 8.0x release and {{CentOS}} 6.
Most of you know I’ve been interested in distributed / cloud storage for quite some time.
And that I find MooseFS to be fascinating. As of 2.0, MooseFS comes in two flavors – the Community Edition, and the Professional Edition. This how-to uses the CE flavor, but it’d work with the Pro version, too.
I started with the MooseFS install guide (pdf) and the Pydio quick start steps. And, as usual, I used Digital Ocean to host the cluster while I built it out. Of course, this will work with any hosting provider (even internal to your data center using something like Backblaze storage pods – I chose Digital Ocean because they have hourly pricing; Chunk Host is a “better” deal if you don’t care about hourly pricing). In many ways, this how-to is in response to my rather hackish (though quite functional) need to offer file storage in an otherwise-overloaded lab several years back. Make sure you have “private networking” (or equivalent) enabled for your VMs – don’t want to be sharing-out your MooseFS storage to just anyone 🙂
Also, as I’ve done in other how-tos on this blog, I’m using {{CentOS}} {{Linux}} for my distro of choice (because I’m an {{RHEL}} guy, and it shortens my learning curve).
With the introduction out of the way, here’s what I did – and what you can do, too:
Preliminaries
- spin-up at least 3 (4 would be better) systems (for purposes of the how-to, low-resource (512M RAM, 20G storage) machines were used; use the biggest [storage] machines you can for Chunk Servers, and the biggest [RAM] machine(s) you can for the Master(s))
- 1 for the MooseFS Master Server (if using Pro, you want at least 2)
- (1 or more for metaloggers – only for the Community edition, and not required)
- 2+ for MooseFS Chunk Servers (minimum required to ensure data is available in the event of a Chunk failure)
- 1 for ownCloud (while this might be able to co-reside with the MooseFS Master – this tutorial uses a fully-separate / tiered approach)
- make sure the servers are either all in the same data center, or that you’re not paying for inter-DC traffic
- make sure you have “private networking” (or equivalent) enabled so you do not share your MooseFS mounts to the world
- make sure you have some swap space on every server (may not matter, but I prefer “safe” to “sorry”) – I covered how to do this in the etherpad tutorial
MooseFS Master
- install MooseFS master
- curl “http://ppa.moosefs.com/RPM-GPG-KEY-MooseFS” > /etc/pki/rpm-gpg/RPM-GPG-KEY-MooseFS && curl “http://ppa.moosefs.com/MooseFS-stable-rhsysv.repo” > /etc/yum.repos.d/MooseFS.repo && yum -y install moosefs-master moosefs-cli
- make changes to /etc/mfs/mfsexports.cfg
- # Allow everything but “meta”.
- #* / rw,alldirs,maproot=0
- 10.132.0.0/16 / rw,alldirs,maproot=0
- add hostname entry to /etc/hosts
- 10.132.41.59 mfsmaster
- start master
- service moosefs-master start
- see how much space is available to you (none to start)
- mfscli -SIN
MooseFS Chunk(s)
- install MooseFS chunk
- curl “http://ppa.moosefs.com/RPM-GPG-KEY-MooseFS” > /etc/pki/rpm-gpg/RPM-GPG-KEY-MooseFS && curl “http://ppa.moosefs.com/MooseFS-stable-rhsysv.repo” > /etc/yum.repos.d/MooseFS.repo && yum -y install moosefs-chunkserver
- add the mfsmaster line from previous steps to /etc/hosts
- cat >> /etc/hosts
- 10.132.41.59 mfsmaster
- <ctrl>-d
- make your share directory
- mkdir /mnt/mfschunks
- add your freshly-made directory to the end of /etc/mfshdd.cfg, with a size you want to share
- /mnt/mfschunks 15GiB
- start the chunk
- service moosefs-chunkserver start
- on the MooseFS master, make sure your new space has become available
- mfscli -SIN
- repeat for as many chunks as you want to have
Pydio / MooseFS Client
- install MooseFS client
- curl “http://ppa.moosefs.com/RPM-GPG-KEY-MooseFS” > /etc/pki/rpm-gpg/RPM-GPG-KEY-MooseFS && curl “http://ppa.moosefs.com/MooseFS-stable-rhsysv.repo” > /etc/yum.repos.d/MooseFS.repo && yum -y install moosefs-client
- add the mfsmaster line from previous steps to /etc/hosts
- cat >> /etc/hosts
- 10.132.41.59 mfsmaster
- <ctrl>-d
- mount MooseFS share somewhere where Pydio will be able to get to it later (we’ll use a bind mount for that in a while)
- mfsmount /mnt/mfs -H mfsmaster
- install {{Apache}} and {{PHP}}
- yum -y install httpd
- yum -y install php-common
- you need more than this, and hopefully Apache grabs it for you – I installed {{Nginx}} then uninstalled it, which brought-in all the PHP stuff I needed (and probably stuff I didn’t)
- modify php.ini to support large files (Pydio is exclusively a webapp for now)
- memory_limit = 384M
- post_max_size = 256M
- upload_max_filesize = 200M
- grab Pydio
- you can use either the yum method, or the manual – I picked manual
- curl http://hivelocity.dl.sourceforge.net/project/ajaxplorer/pydio/stable-channel/6.0.6/pydio-core-6.0.6.tar.gz
- URL correct as of publish date of this blog post
- extract Pydio tgz to /var/www/html
- move everything in /var/www/html/data to /mnt/moosefs
- bind mount /mnt/moosefs to /var/www/html/data
- mount –bind /mnt/moosefs /var/www/html/data
- set ownership of all Pydio files to apache:apache
- cd /var/www/html && chown -R apache:apache *
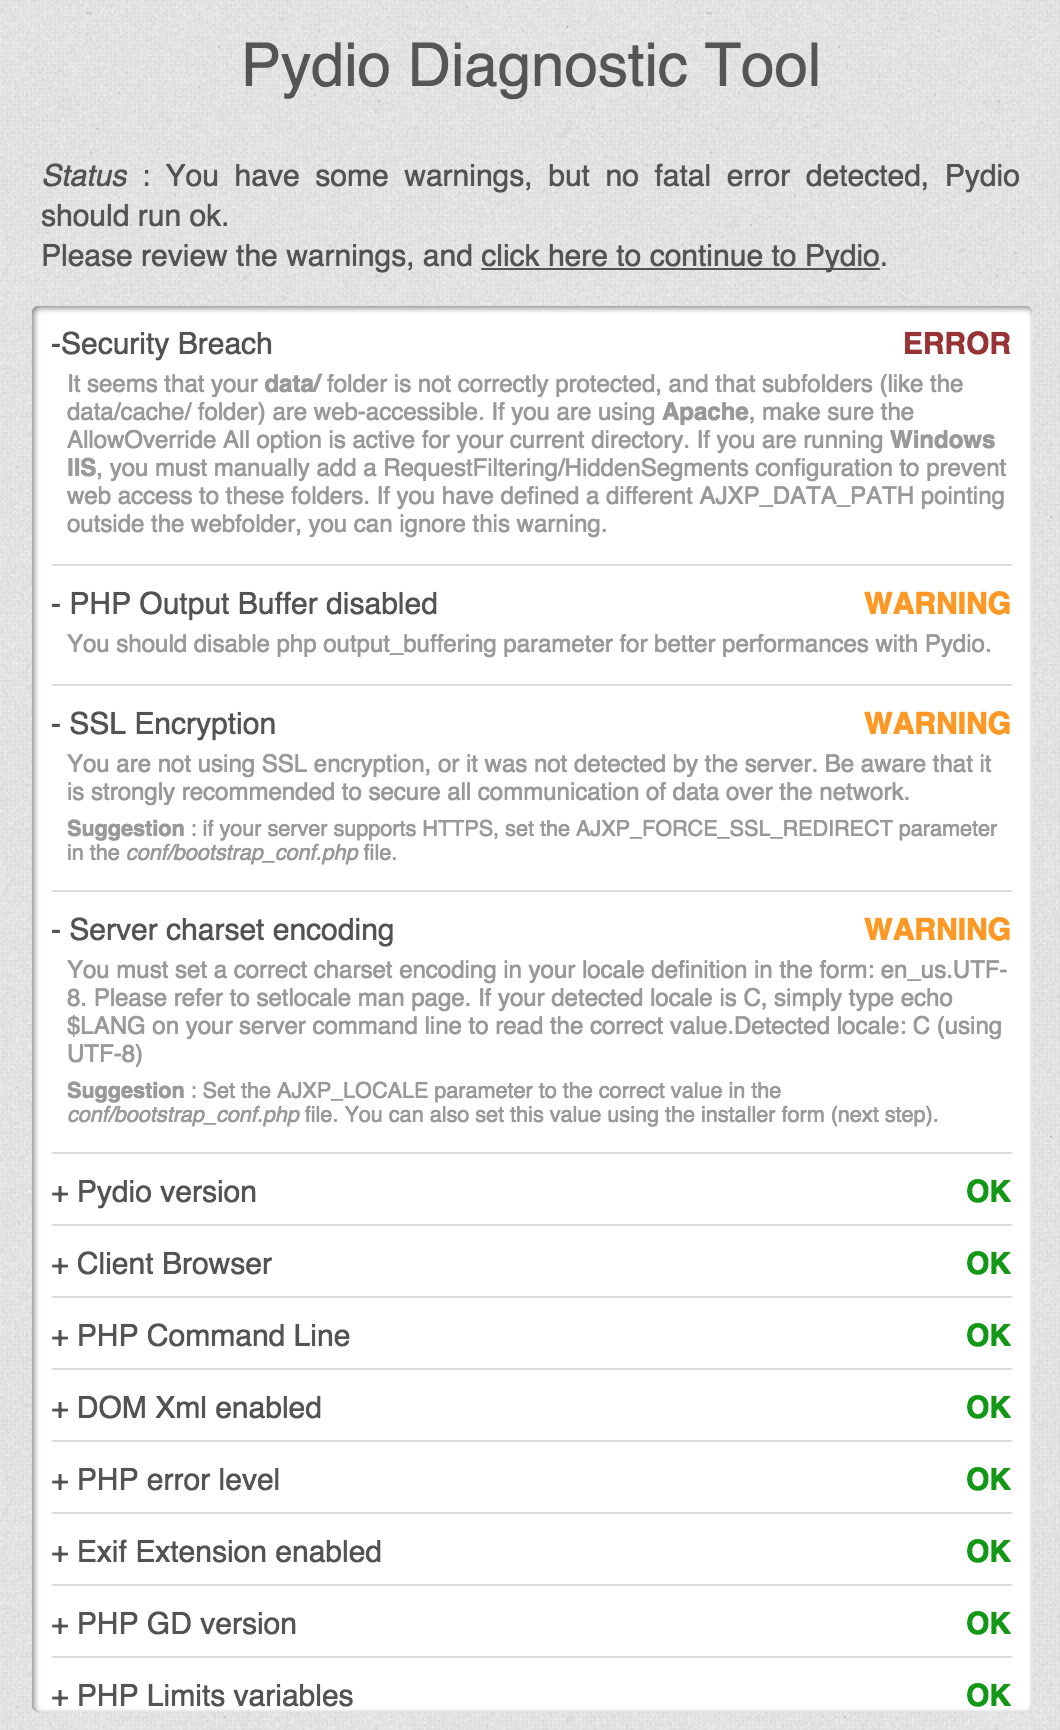
- note – this will give an error such as the following screen:
 this is “ok” – but don’t leave it like this (good enough for a how-to, not production)
- start Pydio wizard
- fill-in forms as they say they should be (admin, etc)
- I picked “No DB” for this tutorial – you should use a database if you want to roll this out “for real”
- login and starting using it
Now what?
Why would you want to do this? Maybe you need an in-house shared/shareable storage environment for your company / organization / school / etc. Maybe you’re just a geek who likes to play with new things. Or maybe you want to get into the {{reselling}} business, and being able to offer a redundant, clustered, {{cloud}}, on-demand type storage service is something you, or your customers, would find profitable.
Caveats of the above how-to:
- nothing about this example is “production-level” in any manner (I used Digital Ocean droplets at the very small end of the spectrum (512M memory, 20G storage, 1 CPU))
- there is a [somewhat outdated] sizing guide for ownCloud (pdf) that shows just how much it wants for resources in anything other than a toy deployment
- Pydio is pretty light on its basic requirements – which also helped this how-to out
- while MooseFS is leaner when it comes to system requirements, it still shouldn’t be nerfed by being stuck on small machines
- you shouldn’t be managing hostnames via /etc/hosts – you should be using DNS
- DNS settings are far more than I wanted to deal with in this tutorial
- security has, intentionally, been ignored in this how-to
- just like verifying your inputs is ignored in the vast majority of programming classes, I ignored security considerations (other than putting the MooseFS servers on non-public-facing IPs)
- don’t be dumb about security – it’s a real issue, and one you need to plan-in from the very start
- DO encrypt your file systems
- DO ensure your passwords are complex (and used rarely)
- DO use key-based authentication wherever possible
- DON’T be naive
- you should be on the mailing list for MooseFS and Pydio forum.
- the communities are excellent, and have been extremely helpful to me, even as a lurker
- I cannot answer more than basic questions about any of the tools used herein
- why I picked what I picked and did it the way I did
- I picked MooseFS because it seems the easiest to run
- I picked Pydio because the ownCloud docs were borked for the 8.0x release on CentOS 6 – and it seems better than alternatives I could find (Seafile, etc) for this tutorial
- I wanted to use {{ownCloud}} because it has clients for everywhere ({{iOS}}, {{Android}}, web, etc)
- I have no affiliation with either MooseFS or {{Pydio}} beyond thinking they’re cool
- there are other filesystems you could use – {{Gluster}}, {{Ceph}}, {{XtreemFS}}, LizardFS, BeeGFS, and more
- there are other cloud storage tools you could use – SparkleShare, Seafile, etc
- I like learning new things and showing them off to others
Final thoughts
Please go make this better and show-off what you did that was smarter, more efficient, cheaper, faster, etc. Turn it into something you could deploy as an AMID on {{AWS}}. Or {{Docker}} containers. Or something I couldn’t imagine. Everything on this site is licensed under the CC BY 3.0 – have fun with what you find, make it awesomer, and then tell everyone else about it.
I think I’ll give LizardFS a try next time – their architecture is, diagrammatically, identical to the “pro” edition of MooseFS. And it’d be fun to have experience with more than one solution.
2 thoughts on “create your own clustered cloud storage system with moosefs and pydio”
Comments are closed.